

How To Repair Mortar On Chimney
Installing Chimney Flashing
Leak-proof your chimney using this traditional, time-tested flashing method.
![]() Time
Time
A total twenty-four hours
![]() Complexity
Complexity
Advanced
![]() Cost
Cost
$51–100
Introduction
This traditional, time-tested flashing method guarantees a leakproof fix. Follow this step-by-stride process and you can gear up the leak and save $100s.
Tools Required
Materials Required
- 26-judge galvanized sheet steel (for prefabricated pieces)
- Bulldoze-in expanding anchors
- Galvanized coil stock
- Galvanized front base flashing
- Galvanized step flashing
- Polyurethane caulk
- Self-adhering roofing membrane (ice and water barrier)
Chimney leaking? Look for flashing problems
Figure A: Chimney flashing details
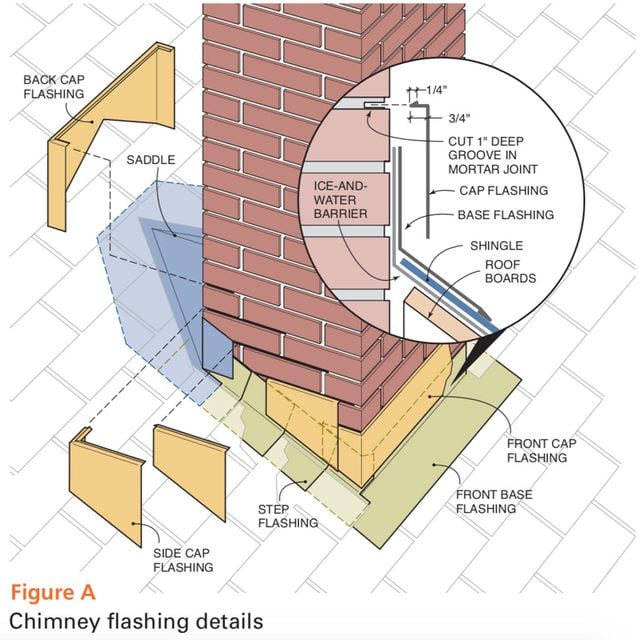
Chimneys are notorious for leaking, and the culprit is almost always the sheet metal flashings. Just ask any roofer. But information technology doesn't take an expert to spot problems—simply look for water-stained ceilings or other telltale signs of leaking in the vicinity of your chimney. So what is placed around a chimney to preclude leaks?
You'll want to install new chimney flashing if it'due south missing, rusted through, falling out or completely covered with roofing tar (a typical short-term fix that'south sure to be hiding bigger bug). It'southward as well a skillful time to install new flashing when you put on new shingles because you'll want it to last as long as the new covering (25 to forty years).
In this commodity, we'll tell yous how to social club new flashing and install it on a brick chimney. Our roof has asphalt shingles, but the procedure is the aforementioned for woods shingles. Slate and tile roofs require special flashing techniques that are best left to the pros. Flashing a chimney is an advanced DIY project. For starters, you accept to be comfortable working on a roof. Then y'all take to mensurate, cutting and bend sheet metal to fit precisely around the chimney and layer all the parts then they shed water. Withal, if you're handy with tools and carefully follow our instructions and diagrams, you'll be able to flash your chimney in a day. And equally far every bit chimney flashing repair cost goes, past doing it yourself, you'll salve hundreds of dollars.
Project pace-by-footstep (12)
Step 1
Gather all materials get-go, so remove old flashing
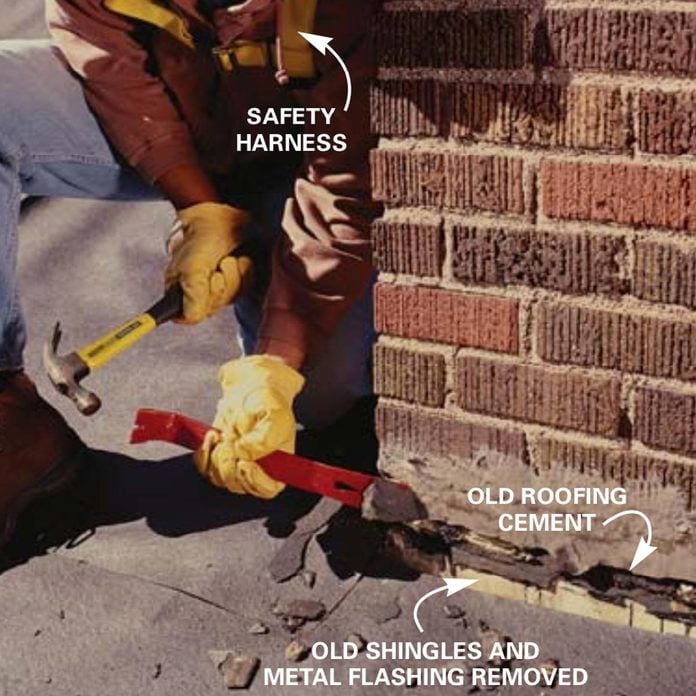
Pry, chisel and scrape off old metal flashings and roofing cement.
Before you lot do anything, go your ladder, roof brackets and prophylactic harness set up and so y'all can work safely and efficiently on the roof. And so measure the chimney and order the saddle and flashing parts (see "How to Buy Chimney Flashing," beneath).
We ordered all our 26-estimate galvanized metal flashing bent to the correct angles and dimensions from a sheet metal shop specializing in roofing. The shop did a nifty job. I dropped off the dimensions and three days subsequently the stuff was gear up to choice upwardly. Even with the custom-made saddle, the flashing was inexpensive. In addition to the flashing and shingles, buy a roll of self-adhering roofing membrane (too called ice-and-h2o barrier), two tubes of polyurethane caulk, and a package of 25 drive-in expanding anchors from a abode eye or covering store.
Likewise basic hand tools like a hammer, tape measure out, 2-ft. level and square, yous'll need a few special tools for working with sheet metallic and cutting and drilling masonry. Buy a good pair of straight-cutting tin snips, a three/16-in. masonry bit and a grinder (a great excuse to buy this useful tool) or a circular saw fitted with a drycut diamond bract for grooving the mortar (Photo 7).
Don't forget condom equipment. You lot'll demand a sturdy extension ladder to become on the roof, and roof brackets and top-quality 2x10 planks to piece of work safely once you lot become in that location. For maximum safety, specially if the roof is steep or loftier, buy a personal autumn arrest system consisting of a safety harness, lanyard, rope-take hold of, rope and roof anchor.
How to Find Your Roof Slope

Find the slope of the roof. Label ane border of a 2-ft. square scrap of plywood or paper-thin "roof" and lay the labeled edge against the roof. Draw a level line at to the lowest degree 12 in. long on the plywood and label the line "run."
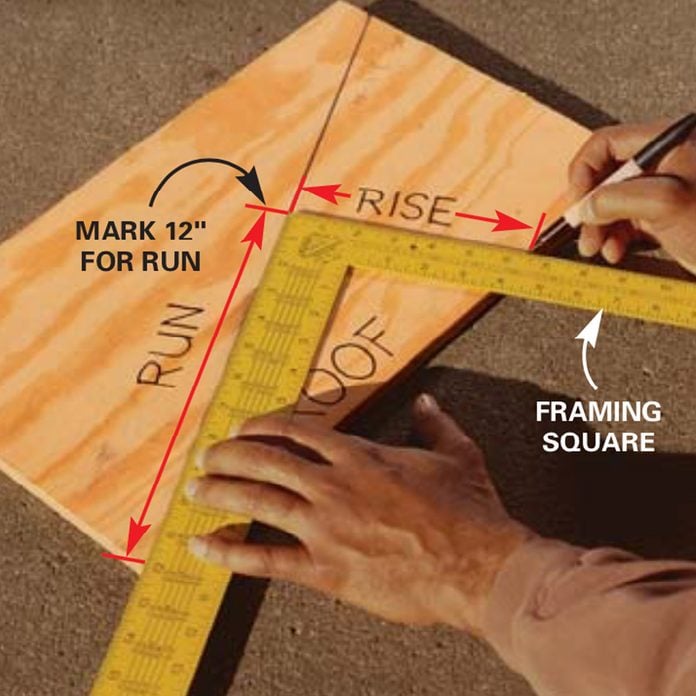
Measure 12 in. along the "run" line and brand a mark. Use a framing foursquare to draw a foursquare line from this mark downwards to the border of the plywood labeled "roof." Label this line "rise." Measure the length of the line labeled "rise" to determine the slope, expressed equally inches of rising for every 12 in. of run. In our example, the roof slope is 6 in. of ascension for every 12 in. of run.
Stride 2
Cut base flashing, and so attach the base flashing
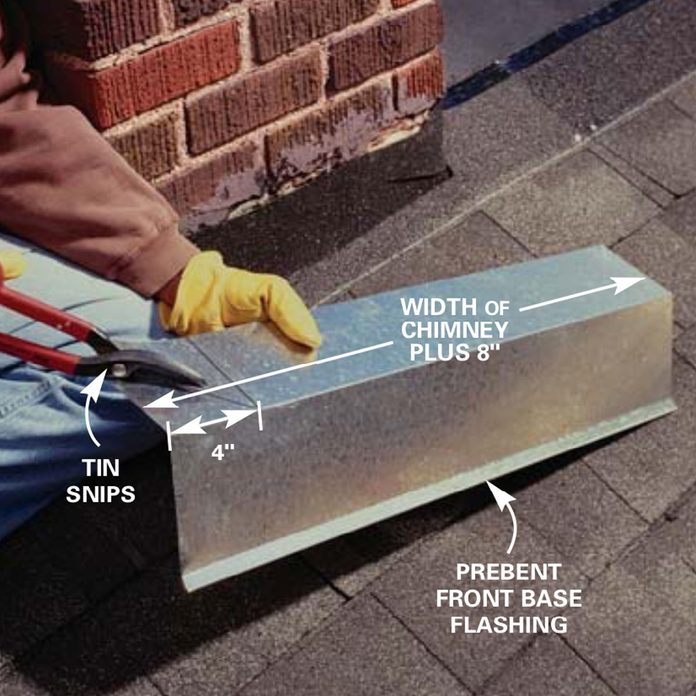
Cut a slice of prebent base flashing to fit across the front of the chimney. Cut a 45-caste angle to bend around one side.
![]()
Step 3
Install forepart base flashing
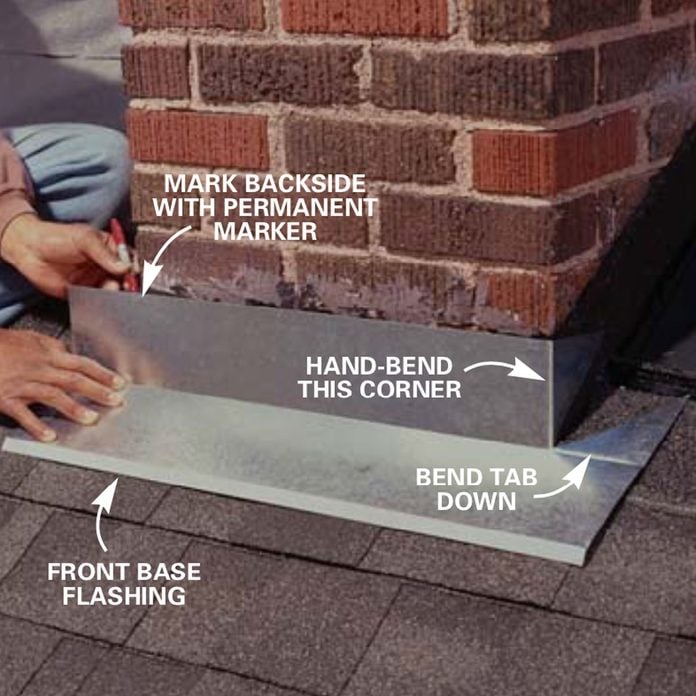
Snug this bent end confronting 1 side of the chimney front. Marking the edge of the chimney on the reverse stop and snip and bend this end. Pound four evenly spaced ane-in. galvanized roofing nails through the front edge of the flashing to concord it in place.
Once you consummate the tearout and clean up, shingle up to the lesser of the chimney (Photo 2) and seal around information technology with 12-in. broad strips of ice-and-h2o bulwark. Lap the strips iv in. up onto the bricks and overlap side by side strips to shed h2o. Run a total 36-in.wide strip across the top of the chimney. Stick this slice to the roof boards and up 8 in. onto the back of the chimney. Afterward you'll seal the new metal saddle to this piece with additional strips of the membrane and and so install roofing paper and shingles over the metal saddle.
Start the flashing chore past installing the commencement piece of base flashing beyond the bottom of the chimney and over the elevation of the shingles (Photo 3).
Step 4
Add stride flashing and the chimney saddle: Install flashing around the corners

Snip and curve a piece of prebent 8-in. square step flashing to fit 1-1/two in. around the front corner as shown. Apply a jelly bean–size dollop of caulk at the corner where the chimney meets the roof. Embed the corner step flashing in the caulk and nail it to the roof with two covering nails.
Step 5
Install flashing around the chimney

Smash the next shingle over the offset step flashing. Then boom another footstep flashing over this shingle. Proceed until you get to the top corner of the chimney. Cutting and bend the last pace flashing around the top.
Step vi
Install the chimney saddle

Slide the prebent and soldered chimney saddle into place behind the chimney. Nail information technology to the roof forth the top border. Space ane-in. galvanized covering nails about every half dozen in. forth the edges or closer if necessary to flatten the metal.
Seal the sides of the chimney with prebent pieces of step flashing nether each course of shingles (Photos 4 and 5). Slightly flatten the step flashing before you blast information technology in to ensure a tighter, spring-tensioned fit against the chimney. Pay shut attention to overlapping each piece of flashing onto the preceding one in such a way that h2o is diverted over the acme of the shingles. This is the key to a successful flashing task.
Complete the base flashing by nailing the saddle to the roof and sealing it with additional strips of membrane (Photo vi). Shingle over the portion of the saddle that rests on the roof and cut the shingles neatly along the valley, leaving about ii in. of metal exposed.
How to Buy Chimney Flashing
Making sharp, straight bends in sheet metallic is catchy unless y'all have access to a tool called a sail metal bending restriction. Even then, you lot need experience to bend complicated shapes. That's why we're recommending that yous order your chimney flashing from a canvas metal fabricating shop. Large roofing companies often take their ain sheet metallic shops and are the all-time place to buy the chimney saddle and flashing; they'll know exactly what you lot need. Otherwise, check the Yellow Pages under "Sheet Metallic." We used 26-guess galvanized sheet steel for our flashing and saddle, but prefinished steel or copper are other possibilities.
Well-nigh chimneys have a pocket-size rooflike structure backside them, called saddle (Photo half dozen), that diverts snow and water to both sides of the chimney. Whether your chimney has a wooden saddle covered with shingles, a canvass metal saddle or no saddle at all (similar the chimney in this story), nosotros recommend installing a new custom-fabricated sheet metal saddle (Photograph 6).
Custom-made saddles are soldered together at critical spots that are hard to seal on saddles that are congenital in place. Soldered sheet metal saddles less than 3 ft. wide are cocky-supporting and easier to install if you lot just tear out any existing metallic or wood saddle. Nearly old saddles were built right over the top of the roof boards and need no patching. Otherwise, fill up in the missing boards before installing the new saddle. Saddles wider than 3 ft. may demand additional back up. Ask your sheet metal fabricator for communication.
Bending and soldering a saddle is complicated, but sheet metal shops need only 2 pieces of data from you to curve upwardly a saddle: the width of the chimney and the slope of the roof (see "How to Find Your Roof Slope,").
In addition to the saddle, you lot'll demand the following sheet metal parts (see Figure A):
- Front base of operations flashing. Order almost 12 in. more than the width of the chimney. Some lumberyards stock a "dormer flashing" that volition work in this location. Y'all may have to adjust the angle by bending it to match your roof gradient.
- Prebent step flashing, 8 x 8 in. Roofers call these "shingle tins". You'll need ane for each shingle along the edge of the chimney plus a few extra. Most lumberyards stock these.
- Forepart cap flashing and side cap flashing. Some canvass metal shops stock a flashing for this purpose, simply you'll probably accept to have it fabricated. Measure at the forepart of the chimney from the roof to the third mortar joint and add together about an inch to determine the elevation you'll need. The shape is relatively simple, so you could buy flat canvas metallic, chosen "coil stock," and bend these yourself.
- Back cap flashing. This flashing is identical to the forepart and side cap flashing.
Step 7
Cover the base flashing with cap flashing: Saw grooves in the mortar
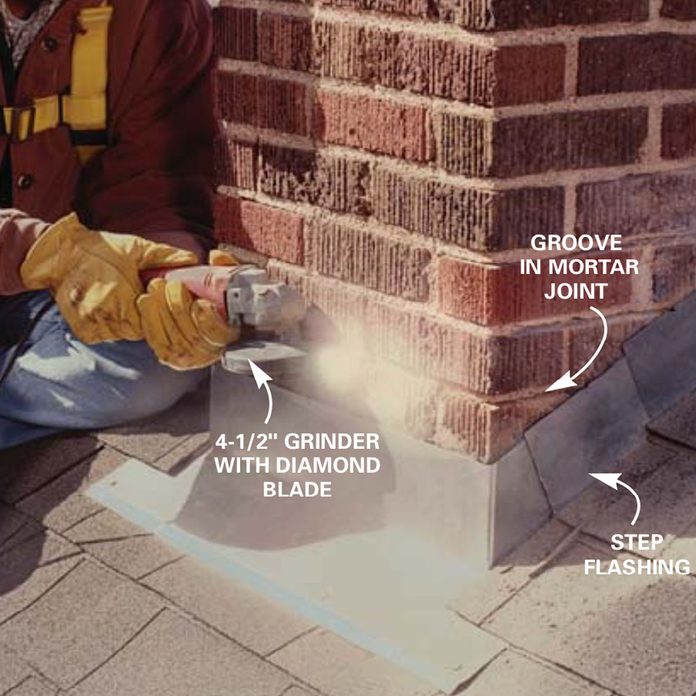
Saw 1-in. deep grooves in the mortar joints to accept the Fifty-shaped cap flashing. Run into Figure A for help in locating the grooves. Use a dry-cut diamond blade mounted in a grinder or a round saw. Wear goggles, hearing protection and a good two-strap grit mask.
Footstep 8
Install the front cap flashing
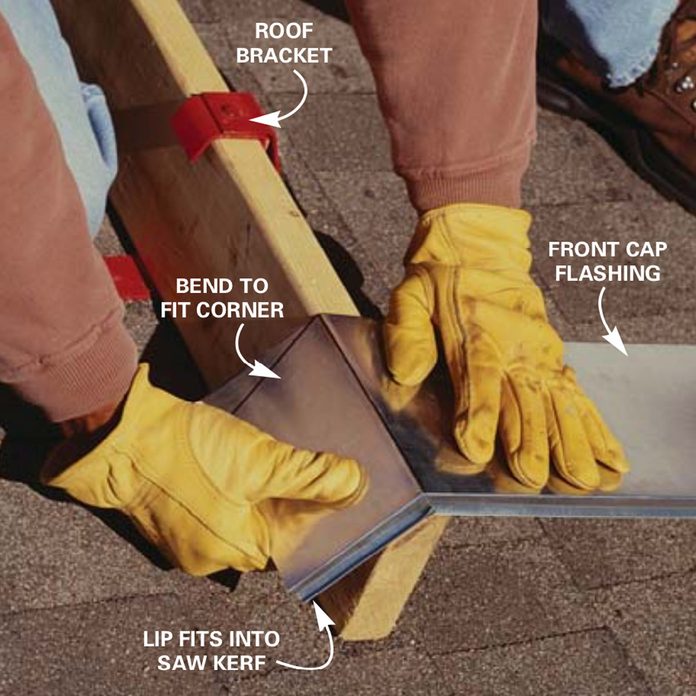
Cut the front cap flashing viii in. longer than the width of the chimney, and then bend information technology effectually the forepart corners of the chimney.
Step ix
Drive in the flange
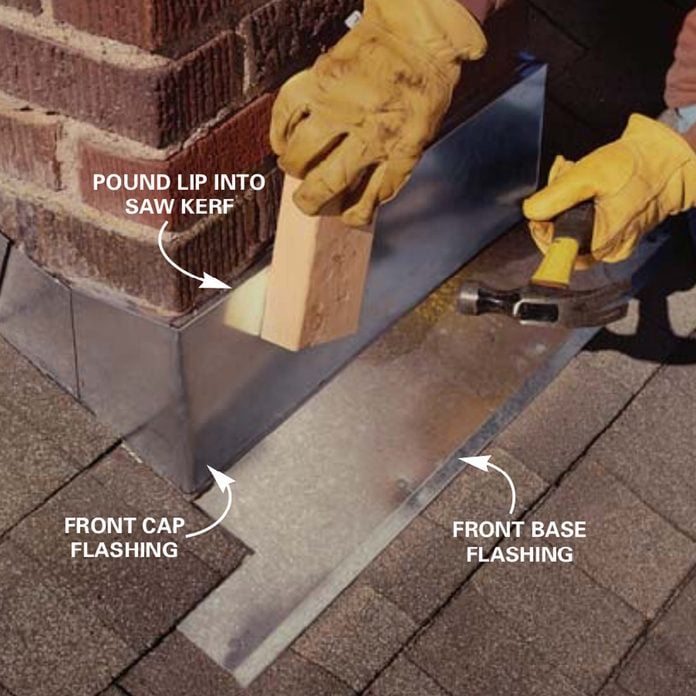
Drive the flange on the cap flashing into the groove in the mortar joint. Utilize a block of wood to keep from denting the flashing.
Footstep x
Secure the flashing
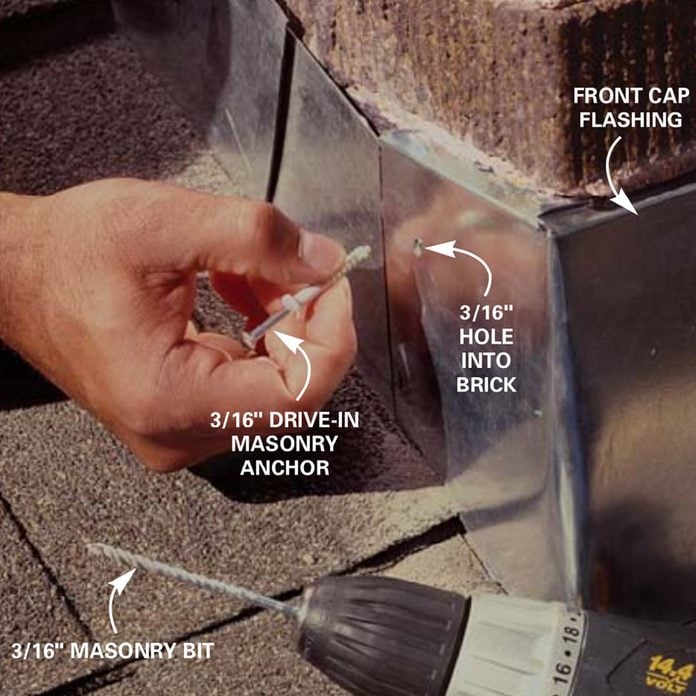
Drill a 3/16-in. x i-1/2 in.-deep hole through the metal and into the bricks on each corner of the chimney. Then press the expanding plastic anchors into the holes and pound in the protruding nail to aggrandize the anchor and secure the flashing.
Pace eleven
Go along to install cap flashing
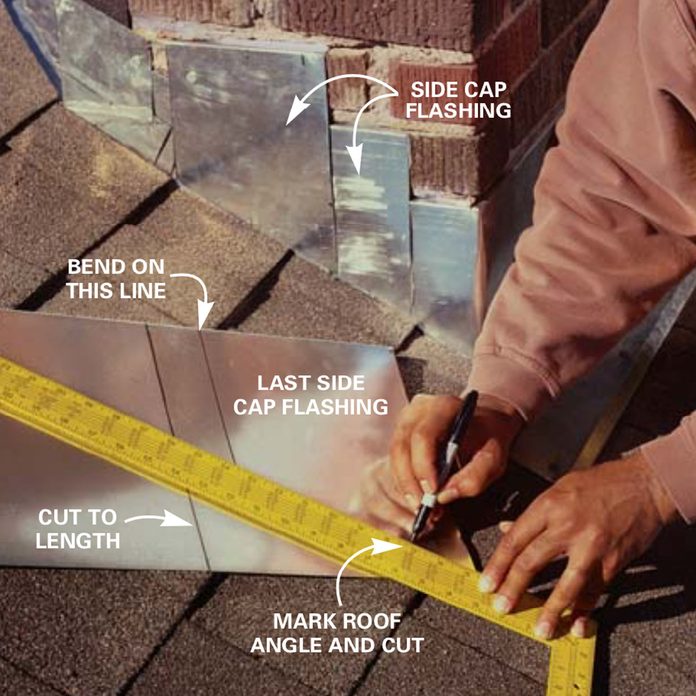
Cut the side cap flashing to fit the bending of the roof and so it overlaps each lower cap flashing at least 2 in. Pound the flashing into the grooves and spike with the bulldoze-in expanding anchors. Curve a piece of cap flashing to fit around the top corner of the chimney and add the cap flashing across the back of the chimney.
Footstep 12
Seal the flashing with caulk
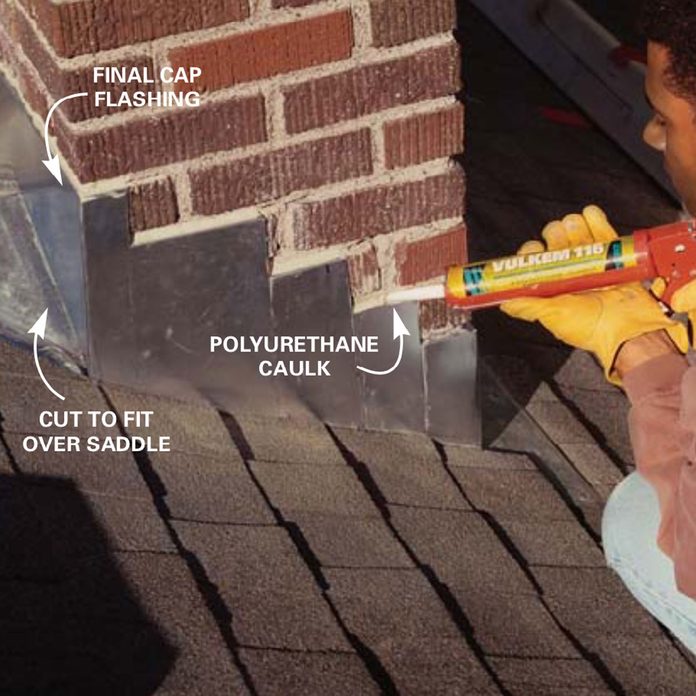
Now it'south time for chimney flashing sealant. Seal the cap flashing past caulking along the mortar joint with polyurethane caulk.
The next step is to mark and cutting the grooves in the chimney's mortar joints to take the cap flashing. Start at the front of the chimney and marking the 3rd mortar joint upwards from the roof. Extend this mark effectually both front end corners about 6 in. Now mark the mortar joints on the sides of the chimney so the flashing steps up until yous attain the back (Photograph 11). Depending on the slope of the roof, each step volition jump upwards one or two mortar joints and should lap over the previous piece of flashing at least 4 in. Marking straight across the back of the chimney to embrace the saddle (Photo 12).
Cutting the groove in the mortar is easiest with a grinder and a diamond blade (Photograph 7). A circular saw with an inexpensive annoying masonry blade volition besides work. Wear goggles, a good grit mask and hearing protection. Cut close to the brick on the lower edge of the mortar articulation. This way, the final caulk joint will exist less visible. Cut the slots virtually one in. deep and ane/viii in. wide. Make them a few inches longer than you think is necessary, keeping in heed that each piece of cap flashing has to overlap the one below information technology by near 2 in.
The little astern bend on the short leg of the cap flashing acts as a barb to hold the flashing in until y'all're ready to caulk. If the flashing is still loose, wedge it tight with a small plastic shim (sold as toilet shims in hardware stores and home centers) or secure it with expanding anchors as shown in Photo 10. In one case all the cap flashings are in identify, complete the job by filling the groove with polyurethane caulk (Photo 12).
Your new flashing will last longer with a coat of paint. But don't paint the bare galvanized metal without cleaning it first with lacquer thinner. Some other option is to society the slightly more than expensive prepainted metal flashing.
Originally Published: January 31, 2022

How To Repair Mortar On Chimney,
Source: https://www.familyhandyman.com/project/installing-chimney-flashing/
Posted by: cannadygles1968.blogspot.com
0 Response to "How To Repair Mortar On Chimney"
Post a Comment